Skype for Business provides many options for forwarding your telephone. Some of these options include forwarding to voice mail, sending the call to another telephone number or a contact, or simultaneously ringing your phone and another number.
Forwarding Incoming Calls to Your Voice Mail
By default, Skype for Business will send all unanswered calls to voice mail within 15 seconds. The instructions below allow you to forward all calls directly to voice mail.
1. Select the “Configuration Gear” to open the “Options” menu.

2. Select “Call Forwarding” on the “Options” menu.
3. Select the radio button in front of “Forward my calls to:”.
4. Select “Voice Mail” on the pull down menu.
5. Select “OK” to save your options

6. A yellow banner will appear prominently across your client indicating your calls are being forwarded to Voice Mail

7. To cancel call forwarding to Voice Mail, select the “Turn Off” button.

Forwarding Incoming Calls to Another Skype for Business Contact
Follow the instructions below to forward your Skype for Business calls to another Skype for Business Contact:
1. Select the “Configuration Gear” to open the “Options” menu.

2. Select “Call Forwarding” on the “Options” menu.
3. Select the radio button in front of “Forward my calls to:”.
4. Select “New Number or Contact” on the pull-down menu.

5. Enter the Contact Name in the search bar.
6. Select the Contact.
7. Select the “OK” button.

8. You will be returned to the Options menu. Your call forward settings will be summarized in the highlighted box.
9. Select “OK” to close the options menu.

10. A yellow banner will appear prominently across your client indicating your calls are being forwarded to the contact selected above.

12. To cancel call forwarding, select the “Turn Off” button.

Forwarding Incoming Calls to Another Telephone Number
The instructions below demonstrate how to forward your Skype for Business calls to another number, such as your cell phone.
1. Select the “Configuration Gear” to open the “Options” menu.

2. Select “Call Forwarding” on the “Options” menu.
3. Select the radio button in front of “Forward my calls to:”.
4. Select “New Number or Contact” on the pull down menu.

5. Enter the complete number in the search bar.
6. Select the number.
7. Select the “OK” button.

8. You will be returned to the Options menu. Your call forward settings will be summarized in the highlighted box.
9. Select “OK” to close the options menu.

10. A yellow banner will appear prominently across your client indicating your calls are being forwarded to the number selected above.

11. To cancel call forwarding, select the “Turn Off” button.

Forwarding Incoming Calls to Delegates
A Skype for Business delegate can make and receive calls on your behalf. You decide who your delegates are, and when they can make or receive calls on your behalf.
The first step requires you to select your delegates and determine how many seconds elapse from the initial ring until the call is forwarded to them. The second step is to set forwarding to point to your delegates.
Follow the instruction below to set up and enable delegation:
1. Select the “Configuration Gear” to open the “Options” menu.

2. Select “Call Forwarding” on the “Options” menu.
3. Select the radio button in front of “Forward my calls to:”.
4. Select “My Delegates” on the pull-down menu.

5. The Call Forwarding – Delegates window will now open.
6. Select the “Add” button to start adding delegates.

7. Enter the Contact Name in the search bar.
8. Select the Contact
9. Select the “OK” button.

10. Continue adding delegates as required.
11. Determine how many seconds elapse from the initial ring until the call is forwarded to your delegates (default = 0, phones ring simultaneously).
12. Select the “OK” button when you are finished adding delegates.

13. Verify your settings in the Call Forward Settings box.
14. Select the “OK” button to save your settings and close the Options menu.

15. You will be returned to your Skype for Business client. Your delegates will now be listed in a new contact group called “Delegates”.
16. You will also receive a visual indicator at the bottom of your client indicating “Call Forwarding On”.

17. Your delegates will receive a yellow banner across their client indication they have been added as your delegate.
18. Your delegate will now have a new contact group called “People I Manage Calls For”.

19. To cancel Call Forwarding, return to the Options Menu and select the radio button in front of “Turn off Call forwarding”’.
20. To edit your delegate members, return to the Options Menu and select “Edit my delegate members”.

Simultaneously Ringing Your Skype for Business Telephone and Another Number
Skype for Business allows you to simultaneously ring your phone and another number, or a contact or group of contacts that you have designated as your Delegate or Team-call member.
Follow the instructions below to simultaneously ring your phone and another number:
1. Select the “Configuration Gear” to open the “Options” menu.
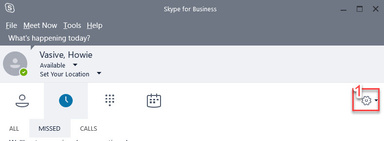
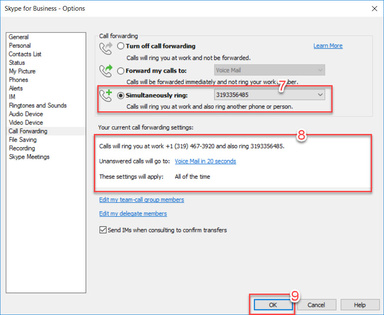
2. Select “Call Forwarding” on the “Options” menu.
3. Select the radio button in front of “Simultaneous ring:”.
4. Select “New Number” on the pull-down menu.

5. The Edit Phone Number window will now open. Enter the complete phone number you wish to ring simultaneously.
6. Select the “Ok” button to save the number.

7. You will be returned to the Options menu; the phone number you just entered will be visible in the Simultaneously ring pull-down.
8. Verify your settings in the Current Call Forward Settings box.
9. Select the “OK” button to save your settings.
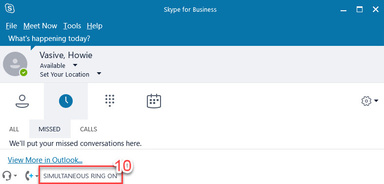
10. The status area on the bottom of your client will indicate Simultaneous Ring On.
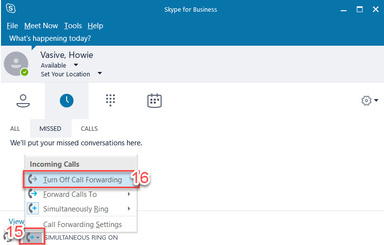
11. To cancel Simultaneous Ring, select the Receiver+ icon in the status bar at the bottom of your client.
12. Select the “Turn Off Call Forwarding” option.
Simultaneously Ringing Your Skype for Business Telephone and Delegates
Skype for Business allows you to simultaneously ring your phone and another number, or a contact or group of contacts that you have designated as your Delegate or Team-call member.
Follow the instructions below to simultaneously ring your phone and your delegate(s):
1. Select the “Configuration Gear” to open the “Options” menu.

2. Select “Call Forwarding” on the “Options” menu.
3. Select the radio button in front of “Simultaneous ring:”.
4. Select “My Delegates” on the pull-down menu.

5. The Call Forwarding - Delegates window will open. Select the “Add” button to start adding delegates.

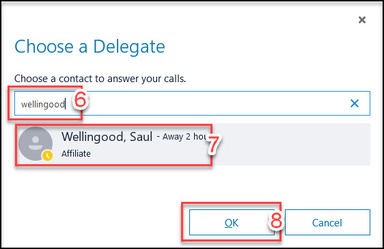
6. Enter the contact name in the search bar.
7. Select the contact.
8. Select “OK” to save your selection.
9. Continue adding delegates as required.
10. Determined how many seconds elapse from the initial ring until your delegates(s) ring simultaneously (default = 0, phones ring simultaneously).
11. Select the “OK” button when you are finished adding delegates.

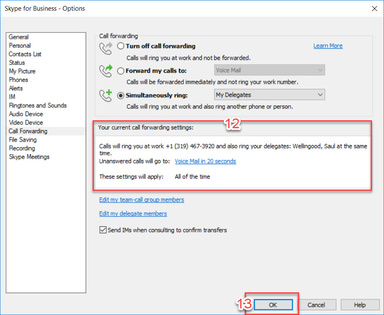
12. You will be returned to the Options menu; verify your settings in the Current Call Forward Settings box.
13. Select the “OK” button to save your settings.
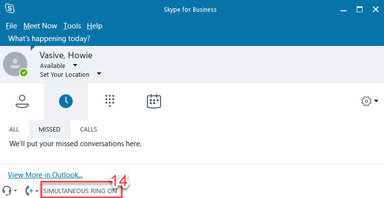
14. The status area on the bottom of your client will indicate Simultaneous Ring On.
15. To cancel Simultaneous Ring, select the Receiver+ icon in the status bar at the bottom of your client.
16. Select the “Turn Off Call Forwarding” option. (insert Simul Delegates #7)

Simultaneously Ringing Your Skype for Business Telephone and Team-Call-Group Members
Skype for Business allows you to simultaneously ring your phone and another number, or a contact or group of contacts that you have designated as your Delegate or Team-call member.
Follow the instructions below to simultaneously ring your phone and your team-call group members:
1. Select the “Configuration Gear” to open the “Options” menu.

2. Select “Call Forwarding” on the “Options” menu.
3. Select the radio button in front of “Simultaneous ring:”.
4. Select “My Team-Call Group” on the pull-down menu.

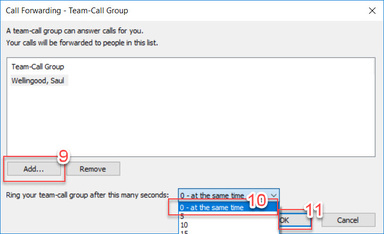
5. The Call Forwarding – Team-Call Group window will open. Select the “Add” button to start adding team-call group members.

6. Enter the contact name in the search bar.
7. Select the contact.
8. Select “OK” to save your selection.

9. Continue adding Team-Call Group Members as required.
10. Determined how many seconds elapse from the initial ring until your Team-call group members ring simultaneously (default = 0, phones ring simultaneously).
11. Select the “OK” button when you are finished adding team-call group members.
12. You will be returned to the Options menu. Verify your settings in the Current Call Forward Settings box.
13. Select the “OK” button to save your settings.

14. The status area on the bottom of your client will indicate Simultaneous Ring On.
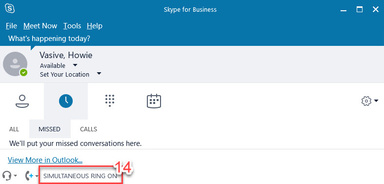
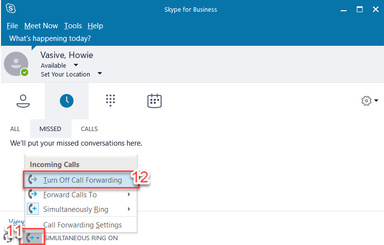
15. To cancel Simultaneous Ring, select the Receiver+ icon in the status bar at the bottom of your client.
16. Select the “Turn Off Call Forwarding” option.
Where Does My Voice Mail Go When I Forward My Phone?
When your Skype for Business phone is forwarded to another phone number or to another Skype for Business contact, any voice mail messages left for you will be received on the phone you have forwarded to. For example, if you forward your Skype for Business phone to a cell phone, voice mail messages will be left on the cell phone. Similarly, calls forwarded to a Skype for Business contact will result in voice mail messages being delivered to the contact.
When your Skype for Business phone is forwarded to your delegate(s), voice mail messages will remain in your mailbox.
When your Skype for Business phone is set to simultaneously ring another phone number, voice mail messages will not be forwarded and will remain in your mailbox.
Please note, voice mail messages are only stored on one device.