This support article pertains to the SiteNow v1 platform. Click here for SiteNow v2 documentation.
When you’re starting off, it helps a lot to know the basics about each of the buttons, on each of the 3 main toolbars.
Start by looking up to the left-hand corner of your screen. You should see a toolbar with about six buttons on it, and, just below that, another toolbar with two buttons. The black toolbar with six buttons is known as the administrative (or “admin”) toolbar. This gives you quick access to most of the editing/configuration powers for your site. The gray, two-button toolbar below is known as the shortcut toolbar. This links commonly-used pages within your site. You can add to this if you wish, or hide it by clicking the down-arrow symbol in the upper right hand corner of the site.
Add Content and Find Content
Administrative Toolbar Buttons and the "Back to site" button
Customize This Page and Change Layout
Add Content and Find Content
Let’s look at the two buttons in the shortcut toolbar first. These are ‘Add content’ and ‘Find content.’ These are essential to create, view, and manage items on your site.

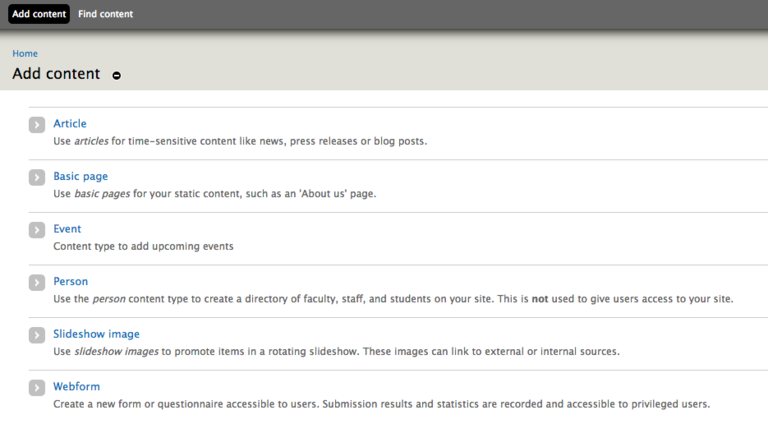
Clicking on ‘Add content’ leads to a screen like the one shown in a picture below, where each of the types of content you can create are listed. This is where you go to start creating things like pages, events, articles, etc.

Find content’ is also very important. This is located to the right of ‘Add content’ on the shortcut toolbar. If you click on this, you should get a page similar to the one shown in the picture below, where everything you have on your site is listed. These are organized in a table format, with the title found on the right, followed horizontally by the type of content (event, person, slideshow image, etc.), the author of the content, its status (published or unpublished), and the date it was last updated.
You can edit or delete any of the content on your site by first navigating to ‘Find content’ and then clicking either ‘edit’ or ‘delete’ on the far right of the table.

If you look to the upper right of the ‘Find content’ screen, there are a few buttons there as well.
- The ‘Content’ button is the one that lists the types of content on your site.
- The ‘Files’ button shows all the files that have been uploaded onto your site (including “demo” images that are automatically on the site, although these can be disabled). These files may include images, PDFs, and more.
- The ‘Find Text’ button allows you to search for a specific word or phrase and find where that word or phrase appears on your site.
- Lastly, ‘Webforms’ leads you to a list of all of your created webforms, with buttons available to edit or clear each one.
Administrative Toolbar Buttons
Look at the admin toolbar at the very top left, above 'Add content' and 'Find content.'
The ‘Apps’ button will lead you to a page like the one shown in the picture below. You will be able to see all of the SiteNow apps, including background image, articles, events, featured slider, people, and SiteNow SEO (search engine optimization). Here you can do things like disabling demo content and looking at the details of each type of app. These details can be helpful for learning what an app looks like, what it does, and what it can be used for.

The ‘Content’ button is the same as the ‘Find content’ button – meaning it will pull up the same list of content items and have the same mini toolbar on the right hand side.

The ‘Structure’ button leads to a short list of things you can add/edit.
- Firstly, you can add, edit, or delete reusable custom content panes. These are panes of information that can be saved and placed on any page.
- The next item on the list is Menus – here you can add or edit links in the menus. You can firstly create and/or edit a footer menu, that will be displayed at the bottom of every page (many use this to link to social media accounts). You can also create a main menu, which usually functions as a navigation bar at the top of each page.
- Lastly in the ‘Structure’ section is the option to manage taxonomy. This is where you manage your classifications, categorizations, and tagging in your site. This helps to organize your website and make it easier for search engines to find.

To the right of ‘Structure’ on the admin toolbar is ‘Appearance.’ Here you can change your theme by setting another theme (such as Hero or Black & Gold) as default. You also have options under the ‘Settings’ button on the upper right side of this page. Here you can manage the display of the site’s name, logo, and slogan. There are also links to customize the University of Iowa Branding Bar and the SiteNow Footer.

Next on the admin toolbar is ‘People.’ This will bring up a list of all the people who have access to your site, as well as their username, status (active or not active), role (webmaster, editor, or administrator), the length of their membership on your site, and the time of their last access. You can add another HawkID user to the site on this page, and you can also transfer site ownership.

The last item along the admin toolbar is ‘Configuration.’ This has some basic options for your site, as well as some more advanced ones.
- Firstly, there’s another place to transfer site ownership, under the ‘People’ section of ‘Configuration.’
- Below this is the ‘Search and Metadata’ section, where you can configure page titles for your site, handle all of the URL redirects, add or remove verifications for your site, and handle the XML sitemap. The ‘Search and Metadata’ options are all much more advanced, and beginners usually choose not to do anything with these.
- On the right side of the ‘Configuration’ screen there is the ‘System’ section at the top. Here you can click on ‘Site information’ to change the site name, slogan, and email address. You can also configure tracking behavior using Google Analytics, but this is also a little more advanced.
- Underneath these two options is the ‘User Interface’ section. Here you can configure the SiteNow footer and the University of Iowa Branding Bar.

How to use the back to site button
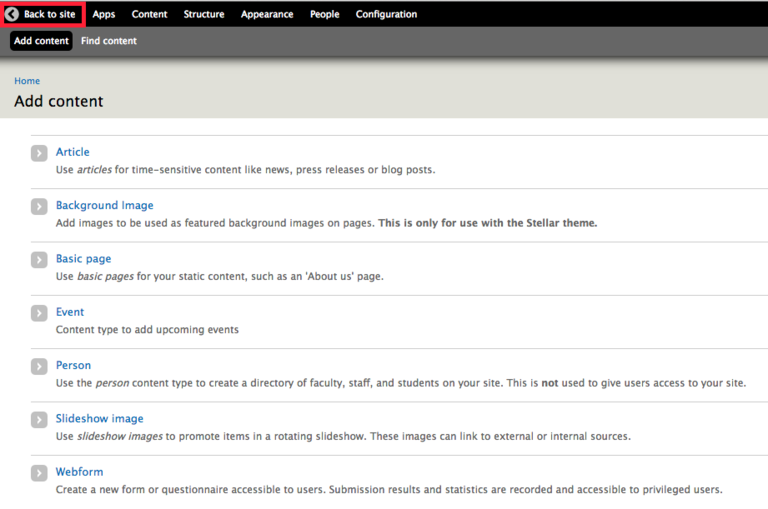
When you view an administration page, the page will be displayed normally in the full content area of the website and the Back to site button will appear in the top left corner of the website in the administration toolbar.
For example, if you click the Add content link in the grey shortcut toolbar, you will be taken to a page that looks something like this:

To return to the last non-administrative page you were on, click the Back to site button (outlined in red in the screenshot above).
Customize This Page and Change Layout
Return to the home page of your site. At the bottom of the screen, there is a black bar with two additional buttons. These are ‘Customize this page’ and ‘Change layout.’

‘Customize this page’ allows you to move items up or down by clicking on the four-arrow symbol at the top right of the box that each item occupies. A blue ‘Content’ box will also appear, allowing you to add a content pane to the page. By clicking the plus sign on the right side of this box, you can add things like lists of people or articles, a featured slideshow, or a Facebook like box or Twitter timeline. You can also create a single-use custom content pane that will only be used for that specific page. You can customize any of the pages you have published on the site in these ways. When you’re done customizing, remember to click ‘Save’ on the bottom of the screen.

Clicking on ‘Change layout’ will give you a screen allowing you to change the way content appears on your site, using one of five layout options. Once you’ve clicked on the layout option you like, you can move your main content around until you find where you want it to go.
