The information below is intended for the Mac user and contains step-by-step instructions for all essential Skype for Business telephone activities.
Placing a Call
There are several ways to make a call with Skype for Business. You can dial a number, call a contact, or call directly into a contact’s voicemail.
Placing a Call to a Contact
- Select the Contacts icon
- Type the contact’s last name or HawkID in the search bar
- Find the user in the Organizational Directory
- Right-click on their name > select Start Call
- Select Skype Call or the Work number

Placing a Call to a Contact’s Voicemail
- Select the Contacts icon
- Type in the user's last name or HawkID in the search bar
- Find the user in the Organizational Directory
- Right-click on their name > select Start Call
- Select Voicemail

Use the Dial Pad to Place a Call
- Select the Call icon
- Enter the number in the search bar above the dial pad using the number keys on your keyboard, or clicking on the digits in the dial pad
- Select the “Call” button or press the Enter key

Dialing Tips
- Find University Users - Enter their name within the search field to find them. Right-click for call options.
- Local University - Dial the 5 digit phone extension.
- Local Non-University - Dial the 7 digit phone number.
- Domestic Long Distance - Dial the 10 digit phone number.
- International Long Distance * - Dial the 7-15 digit phone number.
*For more information on International Calling, see the following support article.
Muting the Microphone During a Call
- If you are on a call, find and click the blue microphone icon to the left of the red hang-up button to mute yourself. Repeat the procedure to unmute yourself.

Receiving a Call
When you receive a call, you have the option of answering the call, ignoring it, or sending it immediately to voice mail.
Answering a Call
- Select the blue receiver on the incoming call window.

Sending a Call to Voice Mail
- To ignore the call and send the called to voicemail:
- Ignore the call; it will continue ringing and after 15-20 seconds will go to voice mail
- To send the caller straight to voicemail:
- Select the red receiver on the lower right side of the pop-up message

Ending a Call
To end a call, select the red hang-up button on the lower right of the call window
Once you end the call, the call window will close automatically. If the other party ends the call, your call window will also close automatically.

Holding and Resuming a Call
Existing calls can be placed on hold. This allows you to answer another call or to gather information to assist the caller.
Placing a Current Call on Hold
1. Select the call control (telephone) icon in the upper right of the call window

2. Select the Hold button from the call control window

3. The call will be placed on hold and a banner will appear in your call window indicating the call is on hold. In addition, a timer will indicate how long the call has been on hold. The caller placed on hold will hear "Music on Hold"; if they are on Skype for Business they will also see a banner indicating the call is on hold

Resuming a Call on Hold
4. To resume the call on hold, select the Resume Call button in the call window or the Resume button in the call control window

Forwarding Calls
Skype for Business provides many options for forwarding your telephone, including forwarding to voice mail, sending the call to another telephone number or a contact, or simultaneously ringing your phone and another number.
Forwarding Calls to Voice Mail
- Select the Preferences option from the Skype for Business menu
- Select Calls on the preferences menu pane
- Select the checkbox to turn on call forwarding
- Open the dropdown menu and select Voicemail
- All calls will now be immediately forwarded to your voicemail

Forwarding Calls to a Contact
- Select the Preferences option from the Skype for Business menu
- Select Calls on the preferences menu pane
- Select the checkbox to turn on call forwarding
- Open the dropdown menu and select Custom Contact or Phone Number

- Enter the contact name in the search bar
- Select the contact name from the search list
- Press the Select button


- All calls will now be immediately forwarded to the Skype for Business contact
- When calls are forwarded to a Skype for Business contact, they will receive a notification that a call is being forwarded and who forwarded the call
Forwarding Calls to Another Number
- Select the Preferences option from the Skype for Business menu
- Select Calls on the preferences menu pane
- Select the checkbox to turn on call forwarding
- Open the dropdown menu and select Custom Contact or Phone Number

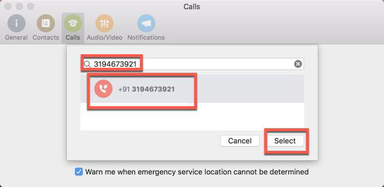
- Enter phone number with area code in the search bar
- Select phone number from search list (notice 9 and 1 are added automatically)
- Press the Select button
- All calls will now be forwarded to the phone number selected

Turning on Simultaneous Ring
- Select the Preferences option from the Skype for Business menu
- Select Calls on the preferences menu pane
- Select the checkbox to turn on call forwarding
- Select the checkbox to turn on Simultaneous Ring
- Open the dropdown menu and select Custom Phone Number

- Enter phone number with areas code in the search bar
- Select phone number from the search list (notice 9 and 1 are added automatically)
- Press the Select button
- All calls will now simultaneously ring your Skype for Business phone and the phone number selected
-

Turning Off Call Forwarding
- Select the Preferences option from the Skype for Business menu
- Select Calls on the preferences menu pane
- Deselect the Call Forwarding checkbox
Transferring a Call
Skype for Business provides several options for transferring a call including unannounced (blind) transfers and announced (warm) transfers.
Unannounced (Blind) Transfer
A blind or unannounced transfer occurs when you transfer a call to another party without speaking to them first. To transfer a call:
- Select the call control (phone) icon in the upper right of the call window

- Select the transfer icon in the call control window

- Enter contact name in the search bar in the Transfer Call window
- Select contact name from the search list
- Press the Transfer button

Announced (Warm) Transfer
A warm or announced transfer occurs when you communicate with the new party before you transfer a call to them. With Skype for Business, you can either place a second call to a new party or use instant messaging (chat) to communicate with a second party before the call is transferred to them. To transfer a call:
- Place the initial call on Hold (see Holding and Resuming Call for details).
- Place a second call, or instant message the party you wish to transfer the call to (see Placing a Call for details).
- Hang up the second call once the second party agrees to accept the transfer.
- Return to the original call on Hold, select the transfer button and transfer the call to the second party (see Unannounced Transfer for details)
Transfer to Voice Mail (Not Supported)
The Skype for Business client on a Mac computer does not support transferring directly to voice mail.
Initiating a Conference Call
In Skype for Business, you can create a conference call in a variety of ways including:
- Adding people to an existing call
- Initiating a conference call and adding people
- Scheduling a conference call.
Each of these methods is discussed below.
Adding People to an Existing Call
Select the Add People icon in the top right corner of the call window.

- Enter the name of the contact you want to add in the search bar
- Select the contact and press Enter
- Alternatively, enter the phone number you want to add to the conference
- Repeat this process for all parties you wish to add to the conference call. Parties added to the call will receive a notice that they are being added to a conference call

- The call dialog window will now show all the participants
- To exit from the call, simply close the dialog window, the other parties will still be connected until they terminate the call on their end

Creating a Conference Call
- Select Conversations from the main menu, and then select Meet Now

- A Call Dialog window will open up with you being the only participant on the call
- Select the Add People icon on the top right to add people to the conference call
- Follow the instructions in the above section to add people to the conference call

Scheduling a Conference Call
You can use the Online Meetings function of Skype for Business to schedule conference calls. See the Online Meetings article for details.
Viewing Conversation History (Recent Calls and Instant Messages)
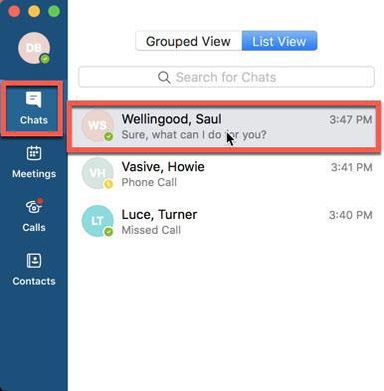
To view recent calls, instant messages (chats) and missed conversations, select the Chats icon on your Skype for Business software client. You will be provided with a list of messages. Click on the selected conversation for more details. Right-click on a conversation and select Delete to remove it from this list.
Conversations also appear in the Conversations Folder in Outlook, while missed call notifications appear in your main folder. Conversations deleted in Outlook will automatically be removed from your Skype for Business software client. Similarly, conversations deleted from Skype for Business will automatically be removed from Outlook.
Using Voicemail
Listening to Voicemail
To listen to a voicemail message, select the Calls icon on your Skype for Business software client. Select the voicemail message you would like to listen to and then select the Play triangle to play the audio message. Messages are also delivered to your Outlook inbox and can be played there as well. Voicemail messages deleted in Skype for Business will automatically be deleted from Outlook. Similarly, messages deleted from Skype for Business will automatically be removed from Outlook.

Changing your Greeting
- To change your greeting, select Preferences from the main Skype for Business menu
- Select the Calls icon on the Preferences dialog, and then select Change Voicemail Greeting
- Follow the audio prompts to change your greeting

