Configuration Instructions
Need assistance in determining the best configuration method for your computer? Contact the ITS Help Desk.
Note: Administrative rights on the computer are required to set up the wireless configuration.
To manually configure your Mac to connect to the UI Wireless eduroam network:
1. Run the Mac OS Software Update and make sure that you have installed all updates for Mac OS X.
- Note: You may need to remove the eduroam wireless network profile in order to configure the network.
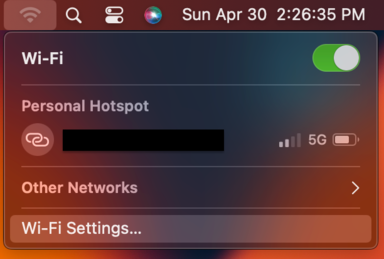
2. Select the configuration options by clicking on the Wireless Icon on your toolbar and selecting Open Network Preferences


3. On the Network Preferences window, click on Wi-Fi and select the Join other Network... from Net. (If the lock in the lower left corner of the screen is closed, click on the lock and use your Mac Admin password to allow changes).

4. On the new window, Enter eduroam in the Network Name field and select WPA2 Enterprise from the Security drop-down list.

5. Enter your HawkID followed by @uiowa.edu in the Username field (jehawk@uiowa.edu, for example) and your HawkID password in the Password field.

6. Click the Join button (you may need to verify changes with your Mac Admin password). Then click the Apply button on the Network Options window.
If you have any questions during the setup process please contact the ITS Help Desk.
Configuration Instructions
1. Run all Windows Updates. Verify that all critical patches and security updates are installed. You may also need to update the drivers for their wireless card. Usually these can be obtained from the laptop manufacturer's website.
2. On the start bar in the lower right hand corner, open up available network connections by selecting the wireless ICON.

3. Select eduroam and click Connect (select Connect Automatically if you wish to have eduroam connect without authenticating when you resume using your computer).

4. Accept the certificate by clicking Connect again.

5. Make sure "Use my Windows user account" is unchecked. Enter your HawkID followed by @uiowa.edu in the Username field (jehawk@uiowa.edu, for example) and your HawkID password in the Password field and click OK.
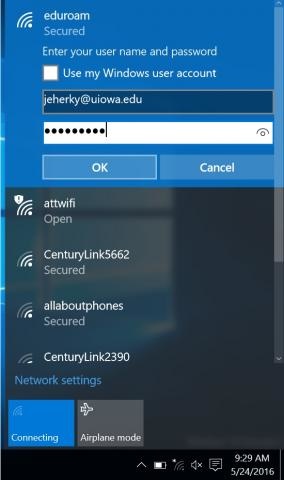
6. Accept the certificate again by clicking connect.
If you have questions during the setup process please contact the ITS Help Desk.
Configuration Instructions
1. Run Windows Updates. Verify that all critical patches and security updates are installed. You may also need to update the drivers for the wireless card. Usually these can be obtained from the laptop manufacturer's website.
2. From the Start screen right click or swipe from the bottom screen to bring up the All Apps option. Select All Apps.

3. Select Control Panel.

Alternatively, you can also access the Control Panel from the Desktop by hitting the Windows key+X

4. Select on the view network status and task link under the Network and Internet category.

5. Select Set up a new connection or network.
6. Select Manually connect to a wireless network.

7. Type in the following information:
- Network name: eduroam
- Security type: WPA2-Enterprise
- Encryption type: AES
- Put a check next to Start this connection automatically.
-Click Next.

8. Select Change connection settings.
9. Select the Security tab.
-Choose a network authentication method: Protected EAP (PEAP) and click the Settings button.
- If you put a check in the box next to Remember my credentials for this connection each time I’m logged on you'll need to remove this check box after changing your password before you can type in a new password.

10. On the Protected EAP Properties window:
- Check the boxes next to Validate server certificate and Connect to these servers.
- Enter net-auth-1.its.uiowa.edu in the Connect to these servers field.
- Select USERTrust RSA Certification Authority from the Trusted Root Certificate Authorities list.
- Make sure that Secured password (EAP-MSCHAP v2) is selected in the Select Authentication Method list.
- Click the Configure button.
11. In the EAP MSCHAP v2 Properties window, remove the check from the Automatically use my... box.
-Click OK until the boxes close.

12. Click ok and close to exit out of the properties and security windows.
13. Go to the list of wireless networks and select eduroam.
14. Enter your HawkID followed by @uiowa.edu in the User name field (jdoe@uiowa.edu, for example) and your HawkID passphrase in the Password field, then click Connect.

Note: Your user name and password are saved in the Windows Wireless configuration tool. When you change your HawkID password, you will need to change it in the wireless configuration tool as well. See the Update Your HawkID Password in UI Wireless Configurations page for more information.
Configuration Instructions
Note: Try running the Eduroam Configuration Assistant Tool on your Windows 7 device before using the manual instructions listed below. When prompted for a username, enter HawkID followed by @uiowa.edu.
1. Run Windows Updates. Verify that all critical patches and security updates are installed. You may also need to update the drivers for the wireless card. Usually these can be obtained from the laptop manufacturer's website.
2. Click on the Network Icon in the Lower Right hand corner of the screen.

3. Click on Open Network and Sharing Center link.

4. Click Manage wireless networks link.

5. Click on Add.

6. Select Manually connect a network profile

7. Fill out the dialog as follows:
Network name: eduroam
- Security type: WPA2-Enterprise
- Encryption type: AES
- Put a check next to Start this connection automatically.
- Click Next.
8. Click on Change connection settings.
9. Click on the Security Tab.

- Choose a network authentication method: Microsoft: Protected EAP (PEAP) and click the Settings button.
- If you put a check in the box next to Cache user information for subsequent connections to this network Windows will save your username and password and allow you to connect automatically. After changing your password you will have to remove this check before you can type in your new password.

9. On the Protected EAP Properties window:
- Check the boxes next to Validate server certificate and Connect to these servers.
- Enter net-auth-1.its.uiowa.edu in the Connect to these servers field.
- Select UserTrust RSA Certification Authority from the Trusted Root Certificate Authorities list.
- Make sure that Secured password (EAP-MSCHAP v2) is selected in the Select Authentication Method list.
- Click the Configure button.

10. In the EAP MSCHAP v2 Properties window, remove the check from the Automatically use my... box.
Click OK until the boxes close.

11. Click on the Advanced settings Button.

12. Check Specify authentication mode and Select User authentication.

13. Click the Okay button.
14. Click the Okay button.
15. Click the Close button.
16. Click on the bubble in the lower right hand corner that says Additional information is required to connect to eduroam. If the bubble does not appear, click on the icon and select Network and Internet Settings to connect to eduroam.

17. Enter your HawkID followed by @uiowa.edu in the User name field (jdoe@uiowa.edu, for example) and your HawkID passphrase in the Password field, then click OK.
Note: Your user name and password are saved in the Windows Wireless configuration tool. When you change your HawkID password, you will need to change it in the wireless configuration tool as well. See the Update Your HawkID Password in UI Wireless Configurations page for more information.
1. Go to the Start menu
2. In the Search programs and files field, type mmc
- mmc should show up at the top under Programs
3. Right click on mmc and select Run as administrator
4. If you are logged on to the computer with an ID with local administrator rights or the UAC is turned on, you will be prompted to "allow the following program to make changes…" Click Yes
5. If you logged on to the computer with an ID that does not have local administrator rights, you will be prompted for user name and password of an ID with local admin rights
6. Choose “Add/Remove Snap-in...” from the File menu
7. The Add or Remove Snap-ins dialog will appear, scroll down to Group Policy Management (on the left) and click Add then click OK to close the Add or Remove Snap-ins dialog box.
8. You will see the Group Policy Management snap-in in the console. Expand the structure to navigate to the OU to which you want to apply the new policy:
9. Right-click on the OU and choose Create a GPO in this domain and link it here...
In the New GPO dialog:
10. Type in the Name: field, a name for your policy that fits the naming convention, with your department, division or college name at the beginning. For instance if you are in the College of Pharmacy, you’d name your policy something like “COP 7 Wireless”
11. Source Starter GPO: should be left as (none)
12. Click OK to create the policy
- You should now see the new group policy under the OU you right clicked on
13. Right click on the new policy and choose Edit; this will open the Group Policy Management Editor dialog box
14. Navigate to: Computer Configuration -> Policies -> Windows Settings -> Security Settings -> Wireless Network (IEEE 802.11) Policies
15. Right click on Wireless Network (IEEE 802.11) Policies and choose Create A New Wireless Network Policy for Windows Vista and Later Releases and this will open the New Wireless Network Policy Properties dialog box
16. Fill in the Policy Name field with a policy name.
17. Fill in a short description in the Description field
18. Click Add and choose Infrastructure
The New Profile Properties dialog will appear
19. Fill in the following fields:
- Profile Name: eduroam
- Network Name(s) (SSID): eduroam and click Add...
20. Click the Security tab:
- Choose WPA2-Enterprise under the Authentication drop-down
- Choose AES under the Encryption drop-down
- Choose Microsoft: Protected EAP (PEAP) under the Select a network authentication method drop-down
- Choose User Authentication under the Authentication Mode: drop –down
- Cache user information for subsequent connections to this network should be checked
- Click the Advanced button
21. In the Advanced Security settings dialog box:
- Check Enable Single Sign On for this network
- Click Perform immediately before User Logon
- Click OK to close the Advanced security settings dialog box
22. On the Security tab of the New Profile properties click the Properties button next to Select a network authentication method
23. The PEAP properties dialog box will come up.
- Check Validate server certificate
- Check Connect to these servers:
- Enter net-auth-1.its.uiowa.edu in the field
- Under Trusted Root Certification Authorities: check “UserTrust RSA Certification Authority”
24. Click OK to exit Properties
Note: If the USERTrust RSA Certification Authority certificate does not appear in the list of Trusted Root Authorities, you can download it here: http://certs.uiowa.edu.
25. Finally, click OK to exit profile properties and click OK to save the new profile
The eduroam Configuration Assistant Tool (CAT) is recommended for configuring laptops and mobile devices that are having issues connecting when configured manually.
For further instructions please refer to the eduroam Configuration Assistant Tool
To connect your Chrome OS laptop to eduroam:
1. Click on the Wifi symbol in the bottom right of your screen and select the network option.

2. Choose Join other... and select advanced.
3. Enter eduroam in the SSID field and select PEAP from the EAP method drop down menu. Enter your HawkID followed by @uiowa.edu (jehawk@uiowa.edu, for example) in the Identity field, your HawkID Password in the Password field, and leave the Anonymous Identity field blank.

4. Click Connect.
If you have any questions during the setup process please contact the ITS Help Desk.
The CLAS Linux Group provides UI Wireless Access for Linux instructions. Please note that these instructions are not supported by the ITS Help Desk.