What is Calendar Combiner?

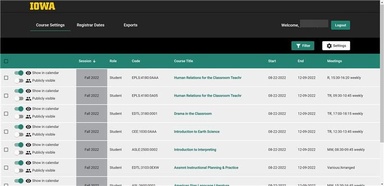
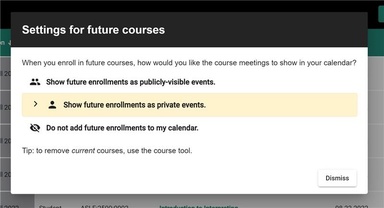
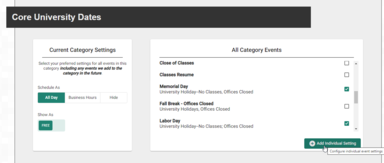
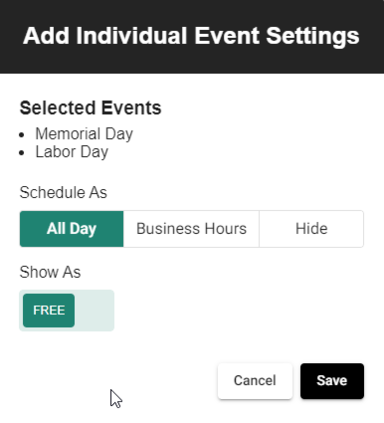
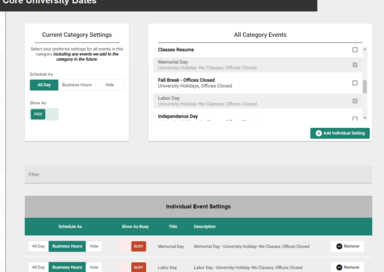
Calendar Combiner provides the ability to place calendar items such as course meeting times and locations, University holidays, and Registrar dates on your Office 365 calendar automatically. Entries can be added as All Day events that are “free” so your time isn’t blocked off, they can be added as a meeting that blocks off your time for the day so you are “busy”, or a combination of both. Details of the academic dates are listed on the Registrar website.


Calendar Combiner login

  1. Login to Calendar Combiner with your HawkID and HawkID password.  If you are enrolled in classes or are teaching classes, you will see classes displayed under Course Settings. If you have no classes, you will need to click on Registrar Dates to see the various categories. 
  2. Select the event(s) you wish to see on your calendar in the Schedule As field.  If you wish to have the category dates appear on your calendar – select All Day or Business Hours depending on your preference.  If you wish to remove the entries from your calendar, select Hide.
  • All Day - will appear at the top of your day and not block your time during the day
  • Business Hours - will appear as a meeting on your calendar that blocks your time from 8am-5pm
  1. Select how the events for each category should display using the Show As toggle – Free or Busy
  • Free - does not block your time 
  • Busy - blocks your time so your calendar displays as busy and not available

  1. To get started, log into Calendar Combiner with your HawkID and HawkID password
  2. To update your class schedule, click the Course Settings tab and use the toggles to determine which courses you want to appear on your Office 365 calendar.
  3. To update your privacy settings, use the toggles for each course to select your option

Settings are saved automatically when you toggle the switches, but changes won’t be reflected until the following day. 

  • Show in Calendar -- if green, it will display in your Office 365 calendar.  If white, it will not display
  • Publicly Visible - if green, the appointment will allow anyone in Office 365 to view the details.  If white, the appointment is only visible to you. 

calendar combiner sample student course load


Any changes you make will apply to your Office 365 calendar overnight. For example: if you make a change to your course schedule (i.e. add/drop a class), those changes will not be reflected on your Office 365 calendar until the next day.


Verify the following information:

  1. Check that all current courses are correct in MyUI. Calendar Combiner pulls the course data from MyUI.
  2. Log into Calendar Combiner. Select the checkbox above your course list to select all courses on the page.
  • If you see a message similar to this one (All XX courses on this page are selected.  Select all XX results), click Select all XX results 
  • If you want to update individual an course, select each individual course you want to update.
  1. Click the down arrow on Bulk Action and select "Remove selected events from calendar". 
  2. Select the checkbox above your course list to select all courses on the page.
  • If you see a message similar to this one (All XX courses on this page are selected.  Select all XX results), click Select all XX results
  • If you want to update an individual course, select each individual course you want to update.
  1. Click the down arrow on Bulk Action and select "Add selected events to your calendar"
  2. Changes to your class schedule will apply to your Office 365 calendar overnight. 
  3. If your course(s) still don't appear on your calendar, contact the ITS Help Desk (its-helpdesk@uiowa.edu or 384-4357)

If you notice duplicate entries on your calendar (e.g. duplicate holidays, class schedules, etc.) please try the following:

  1. Login to Calendar Combiner with your HawkID and Password.
  2. Select the checkbox above your course list to select all courses on the page.
  • If you see a message similar to this one (All XX courses on this page are selected.  Select all XX results), click Select all XX results 
  • If you want to update an individual course, select each individual course you want to update.
  1. Click the down arrow on Bulk Action and select "Remove selected events from calendar". 
  2. Select the checkbox above your course list to select all courses on the page.
  • If you see a message similar to this one (All XX courses on this page are selected.  Select all XX results), click Select all XX results 
  • If you want to update an individual course, select each individual course you want to update.
  1. Click the down arrow on Bulk Action and select "Add selected events to your calendar"
  2. Changes to your class schedule will apply to your Office 365 calendar overnight.
  3. Check your Office 365 calendar to see if the entries have been removed. If you still see some entries, manually delete them from Office 365. 

All Calendar Combiner entries can be found on your calendar by searching on the keyword "calendarcombiner" without spaces. This will bring up a list of all Calendar Combiner entries. Click the X to close the search dialog to bring you back to your normal calendar view.

You have the ability to set defaults for how your future enrolled courses appear on your Office 365 calendar

  1. Click the Settings icon and select your choice for how you wish to view future events. 
  • Show future enrollments as publicly-visible events - this will show the classes so that any Offfice 365 user can view the details of the event
  • Show future enrollments as private events - this will show the classes on your Office 365 calendar so only you can view the details of the event
  • Do not add future enrollments to my calendar - future courses will not be added to your Office 365 calendar
  1. To make a change to your setting, click the desired option


You may wish to customize how the events appear depending on the event type.  For instance, you may want University holidays to appear as meetings on your calendar and marked as “busy”, but dates for class deadlines to appear as All Day events and marked as “free”.

  1. In the category you wish to customize, click View Individual Events.
  2. The All Category Events window will display. Select each event you wish to change (e.g., Memorial Day, Labor Day, Independence Day, etc.) 


  3. Click Add Individual Setting   The Add Individual Event Settings box displays.

  4. For the selected events, select your preferences for the “Schedule As” box – All-Day, Business Hours or Hide
  5. For each event, select your preferences for the the “Show As Busy” box – Free or Busy
  6. Click Save to save your changes.   The Individual Event Settings box will display for the events you have changed.


  1. Click Return when finished making changes. 

There is a plan to automatically color code dates by session, but Outlook allows a fairly easy process to accomplish this task.

  1. Change your Outlook Calendar view to "List"

     
  2. Search and Select for a Session


  3. Categorize the Session by Color


  4. Continue with additional Sessions.

Repeat the process with all available upcoming sessions.

  1. Click Exports
  2. Click Enable Third-Party Access 
  3. You can copy and paste the URL that is generated or click the download button to download the file


Article number: 
896
Last updated: 
August 28, 2023
Service: