Note: To access these drives from off-campus, you must be connected to the VPN client using the directions on this page: https://its.uiowa.edu/support/article/115421
Map RDSS Drive on Windows
- Go to the search box at the bottom left of your screen and search for This PC
In the computer tab at the top, select Map Network Drive

- In the Drive drop-down menu, select an open letter (e.g. R)
In the Folder field type \\iowa.uiowa.edu\shared\researchdata\rdss_HawkID replacing HawkID with the RDSS owner's HawkID
This could be your own or the HawkID of another user who has granted you privileges to their drive

- If you are connecting to the RDSS drive from a computer that you are not logged into with your HawkID or HealthCareID (e.g., a personal computer), check the box "Connect using different credentials".
- Select Finish
To complete the process, you may need to login with your HawkID and password in the dialog box. Make sure to put HawkID@uiowa.edu or IOWA\HawkID (replacing 'HawkID' with your own HawkID) in the username field

Map RDSS Drive on macOS
- Open Finder.
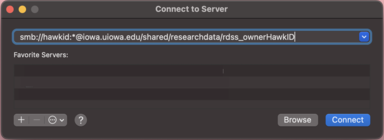
Go to the Go menu at the top of your screen and select Connect to Server...

- Fill in the Server Address field.
If you are logged into the computer with your HawkID (e.g., using a University-provided work computer), enter smb://iowa.uiowa.edu/shared/researchdata/rdss_ownerHawkID replacing ownerHawkID with the RDSS drive owner's HawkID.

If you are not logged into the computer with your HawkID (e.g., using a personal computer or a shared lab computer), enter smb://HawkID:*@iowa.uiowa.edu/shared/researchdata/rdss_ownerHawkID replacing HawkID with your HawkID and ownerHawkID with the RDSS drive owner's HawkID.

Optionally click the + button at the bottom left to add it as a favorite server and then click Connect.

Login with your HawkID@uiowa.edu and HawkID password to access the server
Make sure Registered User is selected
You may select Remember this password in my keychain

If you receive a message like 'Access to your account on the server "iowa.uiowa.edu" has been denied. Contact your system administrator for more information.', please refer to the support article MacOS: Access to your account on the server "iowa.uiowa.edu" has been denied.
Map RDSS Drive on Unix/Linux
- Ensure you have the samba-client package installed. It provides the tools necessary to mount remote Windows shares on Linux.
- Run the following command: id
This will output information about your user account and AD groups you’re a member of. You are only going to need the first two numbers for uid and gid.
- Run the following command, replacing the bold variables:
sudo mount -t cifs //rdss.iowa.uiowa.edu/share /targetdir -o user=HawkID,uid=uid,gid=gid
Explanation of variables:
share = the name of share you are trying to access (e.g. rdss_HawkID)
/targetdir = the path to a directory on your local machine where you will mount this share. This directory must exist on the local machine in order to mount the volume.
HawkID = your HawkID user name
uid = the uid number from step 1
gid = the gid number from step 1
An example of how this would be typed out is:
sudo mount -t cifs //rdss.iowa.uiowa.edu/rdss_HawkID /rdss_HawkID -o user=herky,uid=1234,gid=5678
Note: If you do not know the name of the share you are trying to mount, please contact your local departmental administrator or the ITS Help Desk for assistance.