The information below is intended for the Windows user and contains step-by-step instructions for all essential Skype for Business telephone activities.
Placing a Call
There are several ways to make a call with Skype for Business
If the user is in your Skype for Business Contacts list:
- Select the Contacts icon
- Find the user within your contacts list
- Right click on their name > select Call
- Select Work

If the user is not in your Skype for Business Contacts list, but in the Organizational Directory:
- Select the Contacts icon
- Type in the user's last name or HawkID in the search bar that reads, “Find someone or dial a number”
- Find the user in the Organizational Directory
- Right click on their name > select Call
- Select Work

Use the dial pad to place a call:
- Select the Dial Pad icon
- Enter the number in the search bar that reads, “Find someone or dial a number”
- Select the “Call” button or press the Enter key

Dialing Tips
| Find University Users | Enter their name within the search field to find them. Right-click for call options. |
| Local University | Dial the 5 digit phone extension. |
| Local Non-University | Dial the 7 digit phone number. |
| Domestic Long Distance | Dial the 10 digit phone number. |
| International Long Distance * | Dial the 7-15 digit phone number. |
*For more information on International Calling, see the following support article.
Receiving a Call
To answer the call:
Select anywhere in pop-up message or select the blue receiver on the lower left side of the window.

To ignore the call and send the called to voice mail:
Ignore the call; it will continue ringing and after 15-20 seconds will go to voice mail.
To send the caller straight to voice mail:
Select the red receiver on the lower right side of the pop-up message.

To initiate an IM session with the caller (Skype for Business only) instead of a voice call:
Select the blue comment cloud in the lower center of the pop-up message.

Ending a Call
To end a call, select the red hang up button on the lower right of the call window
Once you end the call, the call window will close automatically. If the other party ends the call, your call window will also close automatically.

Holding and Resuming a Call
To place a call on hold
1. Select the call control icon

2. Select the Hold button from the call control window.

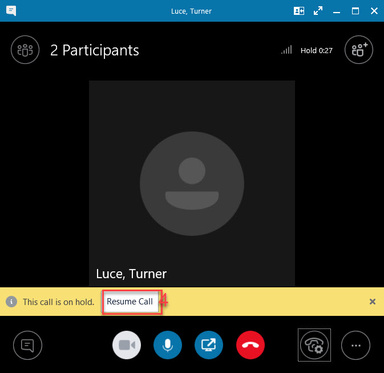
3. The call will be placed on hold and a yellow banner will appear in your call window indicating the call is on hold. The caller placed on hold will hear "Music on Hold"; if they on Skype for Business they will also see a yellow banner indicating the call is on hold.

To resume a call on hold
4. To resume the call select the "Resume Call" button in the call window.

Forwarding Calls
Skype for Business provides many options for forwarding your telephone. Some of these options include forwarding to voice mail, sending the call to another telephone number or a contact, or simultaneously ringing your phone and another number. Additional information on all forwarding options.
Transferring a Call
Skype for Business provides many options for transferring a call. Some of these options include: announced transfers (consultative), unannounced (cold) transfers and transfers to voice mail. Additional information on transfer a call options.
Initiating a Conference Call
In Skype for Business, you can speak with multiple participants at once using a conference call
If you are currently in a call and would like to add another individual
- Click the button in the upper right of the call window.
- Find the individual's name and click OK.
If you are not currently in a call but would like to start a call with multiple people
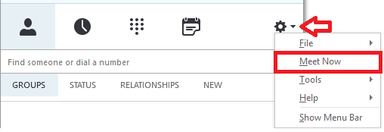
- Within the Skype for Business client window, click the Options arrow > select Meet Now.

- In the upper right of the call/meeting window, click the icon to add more individuals.
- Add whomever is needed to the call and click OK.
If you would like to schedule an online Skype for Business meeting.
Follow these instructions to schedule and participate in an online meeting.
Viewing Conversation History (Recent Calls and Instant Messages)
- Skype for Business keeps a record of all calls (contact name or number, date and time, duration) and instant message conversations (contact name, time, date and conversation). It also records all missed calls.
- Conversation history is retained by default and is considered searchable under the Freedom of Information Act (FOIA).
To view conversation history
Navigate to the Conversation History icon in the Skype for Business client window.
- The All tab will display all answered calls (incoming and outgoing) and instant messages.
- The Missed tab will display a list of any incoming phone calls that you have missed in which the user did not leave a message.
- The Calls tab will display calls only.
Conversation history is also available in Outlook. Select the View More in Outlook link to open the conversation history folder in Outlook.

To delete conversation history
- Conversation history can be deleted in Skype for Business by clicking on the message you want to delete and then pressing the delete key.
- Similarly, you can also delete the conversation in Outlook.
- Either option will simultaneously delete the message from Outlook and Skype for Business.
To turn off conversation history
- Select Tools, then Options, then Personal.
- Deselect the options indicated below, the click on the OK button to save your selections.
- Please note, even if you elect to not save your conversation history, the party on the other end may still do so.

Using Voicemail
Additional Voicemail instructions available.