Please note, the following instructions are intended for non-UI Healthcare employees.  Healthcare employees should navigate to https://mail.healthcare.uiowa.edu and click on the Unified Communication tab to access the UI Healthcare Web Scheduler. 

The Skype for Business Web Scheduler is intended for users that do not have Outlook.  If you have Outlook installed on your computer, you do not need to use the Web Scheduler.

The Web Scheduler is a web-based program that can be used to create new meetings, modify existing meetings, and send email invitations. 


Please note, Skype for Business Web Scheduler does not update participant’s calendars automatically, so participants must be informed of meeting scheduled with the Web Scheduler and any subsequent changes made to existing meetings.

Creating a Skype Meeting

Open your browser and navigate to https://psfbwebext.uiowa.edu/scheduler/.  Where it asks for Domain\Username, type Iowa , followed by a backslash and then your HawkID (for example iowa\samplej), type your password in the password field, and then click on the Continue button to sign-in to the web scheduler.


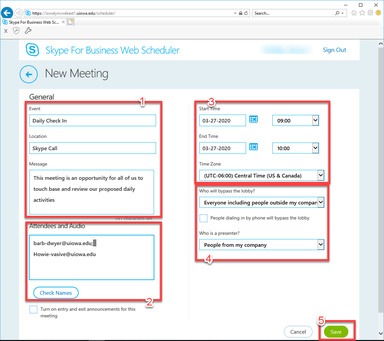
Enter the following information into the New Meeting window:

  1. Enter a name for the event, the location (default is Skype Call) and a Message for attendees.
  2. Add attendees email addressee’s, separated by semicolon in the Attendees and Audio box. University of Iowa email addresses can be verified by clicking the Check Names button.
  3. Set the Start Time and End Time for the meeting and ensure the correct Time Zone is selected.
  4. Decide how attendees will enter the meeting and on presenter options.  This support article provides details on the options available. 
  5. Once all options are set, click on the Save button to save the meeting.


Notifying Attendees

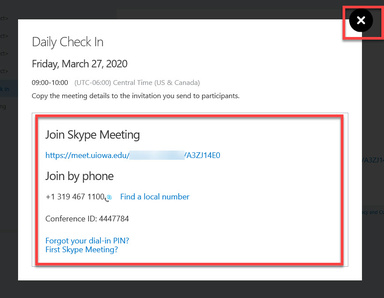
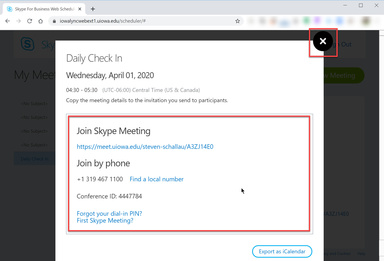
The following window will appear to confirm the meeting has been created.  Participants will not automatically receive an email invitation to the meeting.  The highlighted area below contains the information that attendees need to join the meeting.  Cut the highlighted information and paste it into an email message that you send to attendees.  Once you have sent the information you can click the “X” in the upper-right corner to close the window.


Open your browser and navigate to  https://psfbwebext.uiowa.edu/scheduler/  Where it asks for Domain\Username, type Iowa , followed by a backslash and then your HawkID (for example iowa\samplej), type your password in the password field, and then click on the Continue button to sign-in to the web scheduler.

Click on the New Meeting button on the top left of the window.


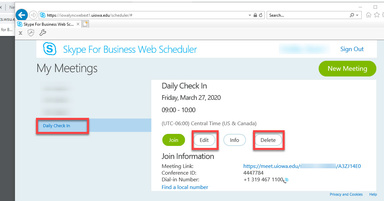
Click on the meeting you wish to join. Note, only meetings you have scheduled with the Web Scheduler will appear here. Click on the Join button to join the meeting.


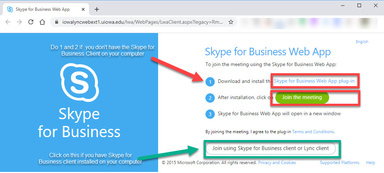
If you have the Skype for Business client installed on your computer, the download isn’t necessary, and you can join the meeting by clicking on the button labeled Join using Skype for Business client or Lync client.  This will launch the meeting using your Skype for Business Desktop client.

If you do not have the Skype for Business client installed on your computer, you will have to install a plug-in to allow you to use your browser to participate in the meeting.  Click on the Skype or Business Web App plug-in link to download and install the plug-in and follow the instructions provided during the installation process.  This a one-time download per computer.  When the download installation process has completed, or if the download has been installed previously, click the Join the meeting button and follow the instructions to join the meeting using your browser.


Open your browser and navigate to https://psfbwebext.uiowa.edu/scheduler/. Where it asks for Domain\Username, type Iowa , followed by a backslash and then your HawkID (for example iowa\samplej), type your password in the password field, and then click on the Continue button to sign-in to the web scheduler.

Click on the New Meeting button on the top left of the window.

Click on the meeting you wish to modify.  Note, only meetings you have scheduled with the Web Scheduler will appear here. Click on the Edit button to modify the meeting or Delete to remove the meeting.  To edit the meeting, follow the instructions provided in the Creating a Skype for Business Meeting and Notifying Attendees pull down menu above.


Once the meeting has been edited, click on the Info button to get the details of the modified meeting.

Notifying Attendees

Please note, Skype for Business Web Scheduler does not update participant’s calendars automatically, so participants must be informed the meeting details have been changed.

The following window will appear with the meeting details  Participants will not automatically receive an email invitation to the meeting.  The highlighted area below contains the information that attendees need to join the meeting.  Cut the highlighted information and paste it into an email message that you send to attendees.  Once you have sent the information you can click the “X” in the upper-right corner to close the window.


Article number: 
118361
Last updated: 
January 10, 2024