Below is a list of frequently asked Microsoft 365 calendaring questions
End Outlook Meetings Early
End Outlook Meetings Early
Automatically add buffer time between meetings by using the built-in Outlook features to end appointments early. Use this time to refill coffee, check email, take a quick walk or whatever you need to do between meetings.
Outlook for Windows (Classic)
- Open the Outlook application
- Click File | Options
- On the left-hand menu, choose Calendar
- Under the Calendar Options section, place a checkmark by Shorten appointments and meetings:
- Select your option - None, End Early or Start Late
- In the Less than one hour: field, select the number of minutes to end early or start late (0, 5, 8 or 10 minutes)
- In the One hour or longer: field, select the number of minutes to end early or start late (0, 5, 10 or 15 minutes)
- Click the OK button
Outlook on the web (OWA) and Outlook for Windows (New)
- Log in to Outlook on the web
- Click on the Apps icon
- In the application menu, select Outlook
- In the menu bar, select Settings (gear icon)
- Near the bottom, choose View all Outlook Settings
- In the left-hand menu, choose Calendar, then Events and Invitations
- Place a checkmark by Shorten duration for all events
- Select your option - End events early or Start events late
- In the Less than one hour: field, select the number of minutes to end early or start late (0, 5, 8 or 10 minutes)
- In the One hour or longer: field, select the number of minutes to end early or start late (0, 5, 10 or 15 minutes)
- Click the Save button
Outlook for Mac (New)
- Select Outlook | Preferences
- Click Calendar
- Click Configure for "Shorten duration for all events"
- Select your option - End events early or Start events late
- In the Less than one hour: field, select the number of minutes to end early or start late (0, 5, 8 or 10 minutes)
- In the One hour or longer: field, select the number of minutes to end early or start late (0, 5, 10 or 15 minutes)
- Click the Save button
Outlook for Mac (Legacy) - no option to configure this setting
Removing a Large Number of Calendar Items in Outlook
Removing a Large Number of Calendar Items in Outlook
If you need to remove a large number of calendar items in Outlook to free up space or improve performance, you can do it by opening your Calendar in List view or by archiving your calendar. Archiving could be used if you may need access to the old calendar items in the future.
Removing Calendar Entries in the List View
- Open your Calendar.
- Click the View tab.
- Click Change View.
- Choose List.
Note: The calendar items will be sorted by Start date. They will be sorted by single events and recurring events. You can sort the calendar items by any of the headings listed: SUBJECT, LOCATION, START, END, RECURRENCE PATTERN, CATEGORIES.
- To delete a range of Calendar entries, click on the first entry to be deleted. Hold down the Shift key and click on the last entry in a given range to be deleted. For example, you could delete all entries older than January 1, 2013.
- Press Delete.
- Repeat Steps 3 and 4 as needed to delete additional Calendar entries.
- Click the View tab.
- Click Change View
- Choose Calendar.
Reset the List View to Default
- Click the View tab.
- Click Reset View.
- Click Yes.
New Skype Meeting Button Missing From Outlook
New Skype Meeting Button Missing From Outlook
Some users report that their "New Skype Meeting" button disappears so they can no longer make a meeting into a Skype meeting.
Follow these steps to add it back in:
- Start Outlook.
- Choose File | Options | Add-Ins
- On the Manage menu, select COM Add-Ins and select Go.
- Click the box next to Skype Meeting Add-in for Microsoft Office 2016 and click OK to save the changes.
For more information see https://support.microsoft.com/en-us/help/3097122/skype-meeting-control-is-not-displayed-on-outlook-2016
Creating an iCalendar (.ics) file
Creating an iCalendar (.ics) file
If you want to share an appointment with other users you can create an .ics file and attach it to an email message. The recipient can then save the appointment to their calendar. This method works for users on the Microsoft 365 server and those who may use a different calendar/mail server.
Outlook for Windows
1. Create the calendar item
2. Choose File | Save as | iCalendar format (*.ics)
3. Click Save.
4. Create a new email message and attach the file.
OR
1. Create the calendar item
2. Select the down arrow next to Forward
3. Select Forward as iCalendar
4. Address the message and click Send
Outlook for Mac
1. Create the calendar event and click Save and Close
2. Go to the File menu and create a new email.
3. Click and drag the event from the calendar into a grayed-out area in the message header and it will appear as an .ics attachment.
OR
1. Create the calendar event and click Save and Close
2. Drag the event to your desktop and it will create a .ics file
3. Create a new email message and attach the file.
Using the Zoom for Outlook Add-In
Using the Zoom for Outlook Add-In
Directions are available here to use the new Zoom Add-In for Outlook on all available platforms.
Make sure that you do not have any additional calendars linked to your calendar when using the Zoom Add-In.
Scheduling a Zoom Meeting using the Zoom add-in
- Create a new meeting by clicking New Meeting (depending on your Outlook version, you may have to select New Meeting again from the drop down list) or double-click in an open timeslot on the calendar
- Click the Add a Zoom Meeting icon (you may have to sign in with your HawkID and HawkID password the first time)

- Type the appointment details and add attendees.
- Click Send to send the invite
NOTE -- if you previously scheduled with the Zoom plug-in, you should remove it and use the add-in instead.
Outlook Work Hours and Location setting
Outlook Work Hours and Location setting
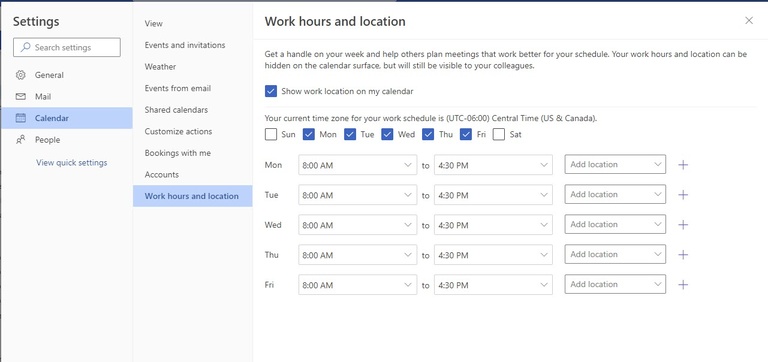
Microsoft 365 has a new feature for your calendar settings - Work Hours and Location. This option allows you to set your work hours for each day of the week and set your location -- Office or Remote. This allows users who have a hybrid work setup or flexible hours to let others know where they will be and what hours available to make it easier for scheduling meetings.
Outlook Windows (New) and Outlook for the web (OWA)
- Choose Settings (gear icon)
- Select Calendar
- Select Work hours and location
- Update the hours and location for each day
- Click Save
For more information see Set your work hours and location in Outlook.
Outlook for Mac (New and Legacy) do not have this option at this time
Sending Calendar Invite but Hiding Attendees
Sending Calendar Invite but Hiding Attendees
The option is only available in the web app (https://office365.uiowa.edu)
- Open Outlook for the web in a web browser.
- Click on the Apps icon
- Click Outlook
- Click Calendar.
- Open the new meeting invitation.
- In the meeting toolbar, click Response options, then click Hide attendee list.
- Click Send to send the meeting invitation with the attendees hidden.
Last updated
Article number
6851