All Day Events are like "sticky notes" and are useful for reminding you of something happening that day, a task to do or letting others know you are away from the office. Some workgroups or departments want you to put an All Day Event on their calendars so they can quickly look to see if you are out all day, partial day, have access to phone/email, etc.  

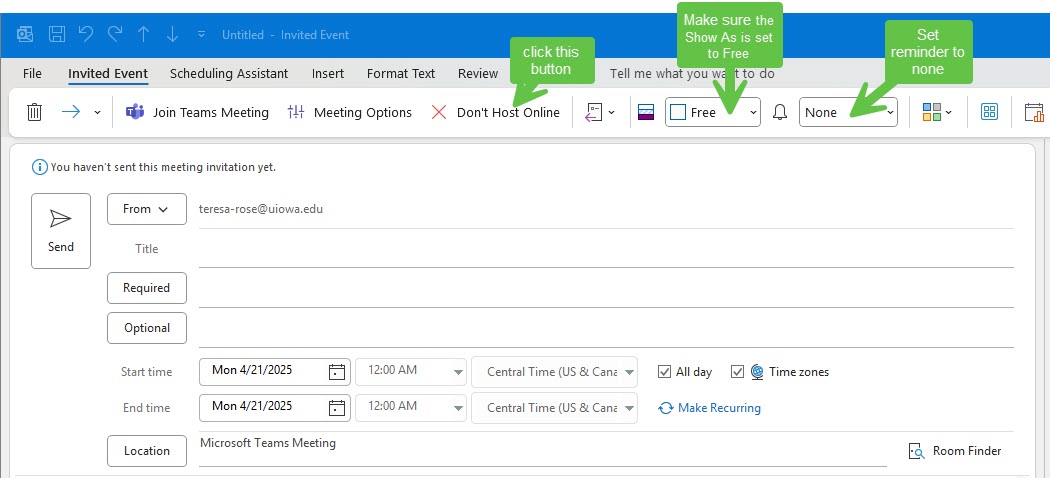
When you create an All Day Event (select the ‘All day event’ checkbox or toggle), the event shows busy for a full 24-hour event lasting from midnight to midnight unless you mark the time as Free. 

  • When inviting others, you may want to change the response options so that each attendee doesn't need to respond to the invite.  This is useful when tracking attendance is not necessary. 
  • You may also want to turn off the Reminder option, especially if it is a vacation notice to your workgroup or department.   

Consider making these changes before sending out the invite so that you are not bombarded with all the calendar responses and also so that the All Day Event doesn't show as Busy on everyone's calendar.

    You may also want to consider setting up an Out of Office message for when you are away.  See Setting Up Auto Replies and Out of Office Messages for more information. 


    For more information, also see Add time away from the office to coworkers' Outlook calendars

    Outlook (Windows) Instructions

    1. Open Outlook and then open the Calendar.
    2. Add an appointment on your own calendar so that your personal calendar time is blocked and your “free/busy” time is accurate.
    3. Next, create an All Day Event for the day(s) you will be out of the office
      1. Click the down arrow next to New Items.
      2. Select All Day Event
      3. In the Show As field, switch the setting to Free so as not to block everyone's calendar.
      4. In the banner, set the Reminder to NONE so a daily reminder does not automatically show up on everyone’s calendar. (If someone wants to change it on their own calendar they can.)
      5. Click the Invite Attendees icon in the banner.
      6. Add the group or individuals to invite from the Global Address List by clicking Required or by manually typing the address(es).
      7. In the banner, click Response Options
      8. De-select the Request Responses option by clicking it so that you do not receive confirmation emails when the invite is accepted or declined. 
      9. If you will be gone for multiple days, simply change the DATE in the Start time and End time fields. This will show the event as one bar across all days and make it clear that you are gone for an extended period.
    4. The Subject of the event should be the description of why you are away from the office and should include:
      1. Your name first
      2. The word AWAY if you are simply out of the office on university business, typically used when you are at a conference or traveling.
      3. The word OFF, if you are off work because of vacation, sick or other reasons.
      4. Approximate time you are out of the office if it is not all day (e.g., 12-4).
      5. Any other short info you want to give to others about your whereabouts that might help them decide how to deal with any issues that might come up. Should they call you on your cell phone, wait for you to come back, get someone else to help because you will not be reachable in the time needed, etc.?
    5. Click Send to send the event to the attendees.

    all day event options windows outlook


    1. Add an appointment on your own calendar so that your personal calendar time is blocked and your “free/busy” time is accurate.
    2. Click New Event
          1. Click the All Day toggle button to make it an All Day event
          2. In the banner, click the Busy icon and select FREE so as not to block everyone’s calendar.
          3. Set the Reminder to NONE so a daily reminder does not automatically show up on everyone’s calendar. (If someone wants to change it on their own calendar they can.)
          4. In the Add Required People box, add the group or individuals you would like to invite using the Global Address List by clicking the person icon or by manually typing the address(es)
          5. In the banner click Attendee Options then click it again to bring up your choices
          6. Click Request Responses option to de-select it so that you do not receive confirmation emails when users accept this on their calendar.
          7. If you are gone for multiple days, simply change the DATE in the Start time and End time fields. This will show the event as one bar across all days and make it clear that you are gone for an extended period.
    3. The Subject of the event should be the description of why you are away from the office and should include
      1. Your name first
      2. The word AWAY if you are simply out of the office on university business, typically used when you are at a conference or traveling.
      3. The word OFF, if you are off work because of vacation, sick or other reasons.
      4. Approximate time you are out of the office if it is not all day (e.g., 12-4).
      5. Any other short info you want to give to others about your whereabouts that might help them decide how to deal with any issues that might come up. Should they call you on your cell phone, wait for you to come back, get someone else to help because you will not be reachable in the time needed, etc.?
    4. Click Send to send the event to the attendees

    Outlook Mac "New" Options

    outlook mac all day event options new version


    Outlook on the web Options

    owa all day event options
    1. Add an appointment on your own calendar so that your personal calendar time is blocked and your “free/busy” time is accurate.
    2. Click the Meeting icon
          1. Click the All Day checkbox to make it an All Day event
          2. In the banner, click the Busy icon and select FREE so as not to block everyone’s calendar.
          3. Set the Reminder to NONE so a daily reminder does not automatically show up on everyone’s calendar. (If someone wants to change it on their own calendar they can.)
          4. In the To box, add the group or individuals you would like to invite using the Global Address List by clicking the address book icon or by manually typing the address(es)
          5. Click Request Responses option to de-select it so that you do not receive confirmation emails when users accept this on their calendar.
          6. If you are gone for multiple days, simply change the DATE in the Start time and End time fields. This will show the event as one bar across all days and make it clear that you are gone for an extended period.
    3. The Subject of the event should be the description of why you are away from the office and should include
      1. Your name first
      2. The word AWAY if you are simply out of the office on university business, typically used when you are at a conference or traveling.
      3. The word OFF, if you are off work because of vacation, sick or other reasons.
      4. Approximate time you are out of the office if it is not all day (e.g., 12-4).
      5. Any other short info you want to give to others about your whereabouts that might help them decide how to deal with any issues that might come up. Should they call you on your cell phone, wait for you to come back, get someone else to help because you will not be reachable in the time needed, etc.?
    4. Click Send to send the event to the attendees

    outlook mac all day event options old version
    Article number: 
    4026
    Last updated: 
    February 15, 2023
    Category: